For quite some time I had to find out with my w209 that with outside temperatures from -14°C to -23°C the cooling water temperature rose quite fast to 65°C to 70°C, but then it was difficult to keep it. When the heater was switched on for comfort inside the car, the temperature dropped very quickly to 60°C even after a few kilometres, which worried me a lot, so –> the heater went out and froze for the sake of the car.
At some point I finally decided to change the thermostat, because the SET temperature of 85°C could only be reached when stationary, but not when driving.
The parts were also all in stock at Mercedes:
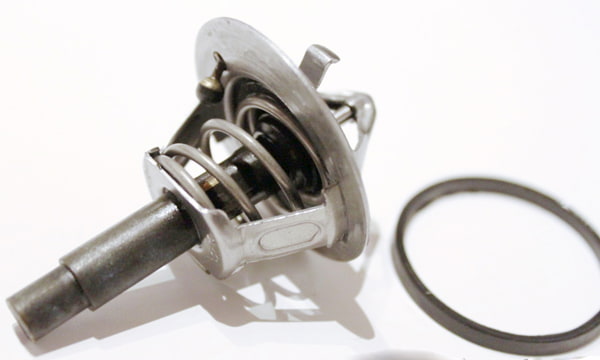
- A 271 203 05 75 thermostat 90°C
From memory:
- Car –> Lifting platform
- Cooling water tank –> Open
- Lifting platform –> High
- Underride guard –> Down (6 times 8 nut)
- Radiator drain valve (at the bottom of the radiator, on the driver’s side – red valve) –> Open (have a large, clean bucket ready to collect the coolant – 8.5l coolant quantity)
At this point I have to say that I changed the coolant only two months ago to make it less suitable for freezing. I didn’t feel like buying Glysantin G48 again. Therefore the recycling of the coolant, otherwise I would advise to change, even if Mercedes indicates coolant intervals of 250 000km.
- When the worst was over (ca.4l) –> drain valve closed, and the car lowered to working height.
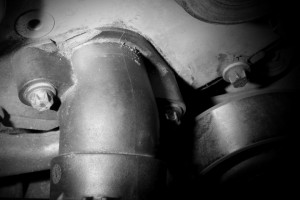
By pressing the cooling hoses it was quickly determined that really enough water had run off to be able to unscrew the flange ‘dry’. Two times 8-mm nut (great work, no tool change)
After the carpenter’s nails were unscrewed large screws, the flange could be pulled off.
Patience! The flange was difficult to remove. With a little shaking and turning it was finally possible. (The chipping on picture 2 was already before I put on hand 😉 )
So the worst was over.
If you now have the flange with the thermostat in your hand, you can now change the gasket on the flange itself, as well as the gasket between thermostat and flange, put the thermostat on the flange and (ATTENTION!!!) when pushing in the ‘Flange Gasket Thermostat’, make sure that the angular gasket does not twist!
Screw back in and tightened (9NM)
- Slowly refill the collected coolant.
- Pump the coolant lines a little bit.
- The coolant level will still be a little high, so start the engine and let it warm up, occasionally on the pump lines.
- The old liquid level should be reached again quickly.
Done!
Supplement (the day after)
What really strikes me as very positive is that the fuel consumption, despite minus temperatures, has almost fallen to summer levels. Before the change I could park the car on my working distance (38km) hardly under 8,7l/100km. I had blamed it on the low temperatures and therefore didn’t care. But now the usual 7,2l/100km are in the AI again. Thus the investment pays off even quite fast.
Duration: 20-30min